
Time to read: 6 minutes.
Time to implement: 15 minutes.

This is the second in a series of blogs explaining how to use BlastShield™ for securing and connecting remote access to endpoints in the Cloud and on-premises. In this blog, I will describe how to set up secure remote access to Docker workloads using a BlastShield Agent. I'll be using Docker running on a Raspberry Pi for this example.
Introduction
Docker is now widely used by software engineers and DevOps teams because it speeds up software development and simplifies the packaging and distribution of applications. It's rapidly becoming the standard for organizations to deploy services in their environment. Still, it is up to you to take the appropriate steps to secure access to the docker server. I will run Docker on a Raspberry Pi for this blog and secure it with a BlastShield™ Agent. The Raspberry Pi is a low-cost, credit card-sized, single-board computer that runs Linux and uses an ARM processor. Docker is available to run on the Pi, making it a low-cost platform for development work.
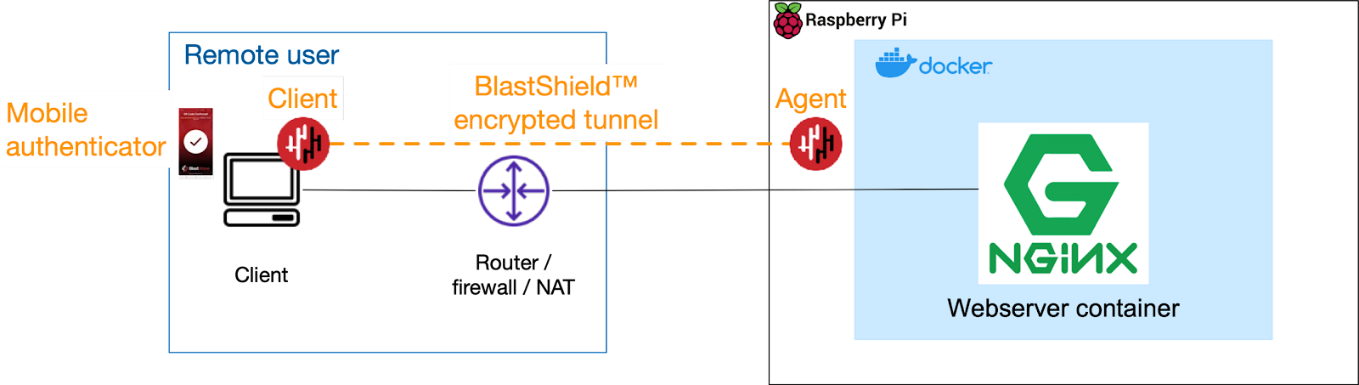
To securely share access to containers running on the Pi with other remote users, you can install a BlastShield™ Agent. Once installed on the Raspberry Pi, the Agent will encrypt connections between the Raspberry Pi and authorized remote users. It acts like a micro-firewall to block unauthorized access. Access authorization is done by zero-trust with a default drop policy. Authorized connections are then whitelisted by creating access policies. To connect, a user must first authenticate via the BlastShield™ mobile authenticator app, which uses passwordless multi-factor authentication. This will reduce the time it takes to set up remote access, reduce the risk of credential theft, and make it easy to share access with a defined group of remote users. I'm going to show you how to set this up.
Prerequisites
- You'll need a Raspberry Pi. I'm using model 4B in this example.
- You will also need a BlastShield™ Orchestrator, which you'll need to register and connect to. You can sign-up for a free account here, where you can also download the BlastShield™ Desktop client and Mobile Authenticator app.
- Docker should be installed on the Raspberry Pi. I used the Docker installation script to install Docker on the Raspberry Pi.
- An ARM-compatible Docker image to run on the Raspberry Pi. I used the Nginx official image.
Setup
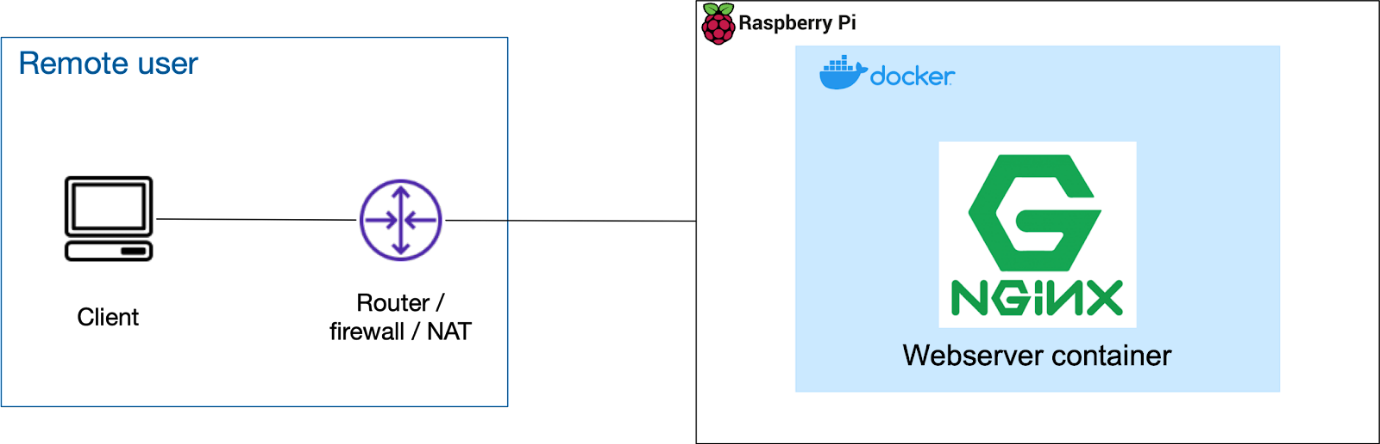
Setting up with BlastShield is very quick, and you should be able to get connectivity working in about 5 minutes. Before you start, your connection to the container should look like the figure below.
To create and set up the BlastShield™ Agent, use the following steps:
- Add a new Agent in the Orchestrator.
- Install the Agent on the Raspberry Pi
- The Agent will auto-start and register with the Orchestrator
- Configure policy to allow access to the Agent
- Remotely connect to Docker on the Raspberry Pi and start a container
- Secure the host firewall to block lateral movement on the LAN (optional)
This will allow on-demand encrypted connections between the Agent on the Raspberry Pi and the Client on your computer as shown here. This can be used either across a LAN or across the WAN or internet.
Step 1: Add a new Agent in the Orchestrator
- Connect to your BlastShield™ network and open the Orchestrator in your web browser.
- Click on Agents in the sidebar and click the red add new agent button at the top right.
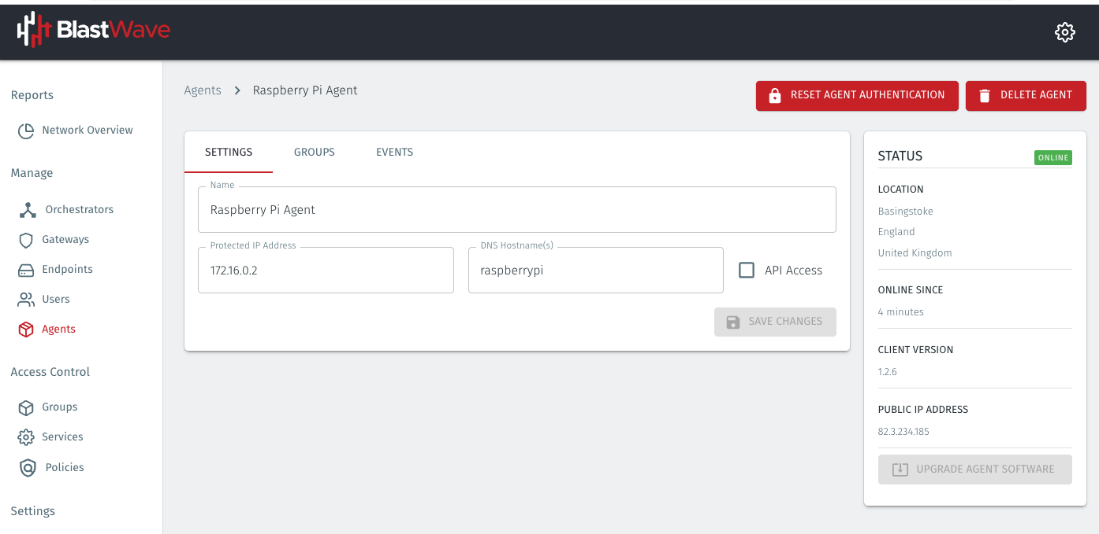
- The New Agent dialogue opens. Add a Name and DNS Hostname. A protected IP address for the Agent will be created. BlastShield™ runs its own internal DNS server to configure hostnames and IP addresses on the Agent and use the hostname to address the Agent. The default DNS suffix is blastshield.io. In this example, I have set the hostname of 'raspberry' and I will use the hostname to connect to the nginx web frontend later on.
- Then click on the red "Save and Download Invitation" button and choose the option for "Save and copy Linux/macOS installation command to the clipboard". Click on that option to copy the command.
You can watch a 2 minute video on how to add a new Agent here:
Step 2: Install the Agent on the Raspberry Pi.
Open a terminal session on the Raspberry Pi and paste the command you just copied to the terminal and hit enter. This will start the software download.
Step 3: The Agent will auto-start and register with the Orchestrator
The software will automatically install and run. The Agent will then automatically register with the Orchestrator. When the process has completed you will see the following message in the terminal window:
Installation successful, the agent IP address is <Agent IP address>.
You can also verify the Agent status using systemctl.
On the Orchestrator, the Agent status will show as online.
Step 4: Configure policy to allow access to the Agent
BlastShield™ is a zero-trust access solution, so you must provision a policy to authorise access to the Agent on the Raspberry Pi before you can connect to it. You can do this from the Orchestrator. The process is as follows:
- Create a group for your user(s). You can have more than one user in a group.
- Create a group for your Agent. You can have multiple Agents in a group.
- Create a policy to link the user group to the Agent group in the direction you want.
Here's a video showing how to do this:
Step 5: Remotely connect to Docker on the Raspberry Pi and start a container
Now you can reconnect to the Agent using the BlastShield™ secure access, using the BlastShield™ Mobile Authenticator app to authenticate. Here's a video showing how authentication works:
Once authenticated, you can connect to the Raspberry Pi using your preferred connection method. Use the Agent IP address or Agent hostname you assigned in Step 1 when you connect to the Pi.
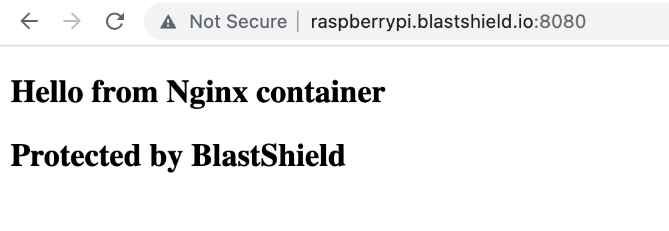
Also, you can use the BlastShield Agent to access the container directly. For this example, I ran a simple Nginx container on the Raspberry Pi and published it on port 8080.
docker run -it --rm -d -p 8080:80 --name web -v ~/site-content:/usr/share/nginx/html nginx
You can then use either the Agent IP address or the Agent hostname to access the container, where “raspberry” is the hostname and “blastshield.io” is the DNS suffix provisioned on the Orchestrator.
You could also create a service in the Orchestrator to define the port on which you publish a container and then add that service to your access policy. This has the effect of filtering the access policy to allow only packets going to that port number. This means that you can assign policies to containers based on the published port number, allowing remote access only to the port on that container.
For example, the following shows a policy in the Orchestrator, which allows only port 8080, the published port on my Nginx container in the previous example.
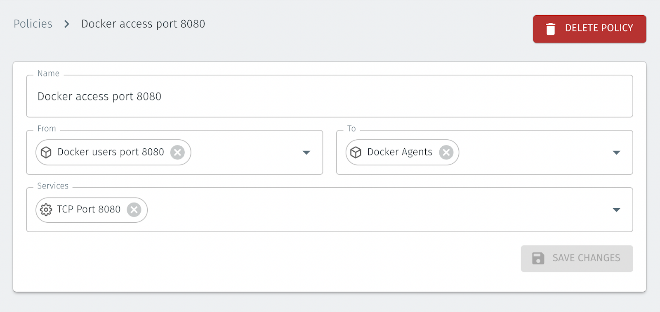
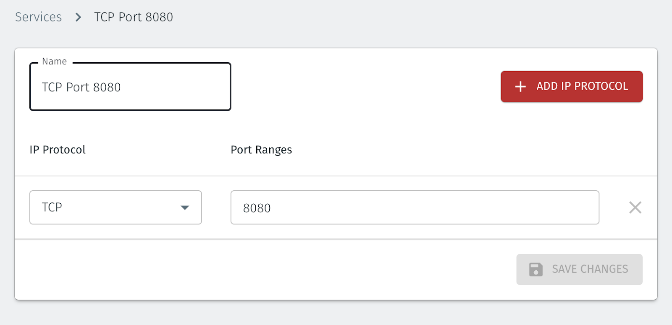
The ‘port 8080’ service is configured by configuring the protocol and port(s) in the Orchestrator, as shown below.
Step 6: Secure the host firewall to block lateral movement on the LAN (optional)
You can optionally lock down the network interface of the Raspberry Pi so that only the BlastShield interface is used to receive inbound connections. This means that only authenticated and authorized connections are allowed on the Pi, and lateral movement within the LAN is blocked. An example of how to do this using iptables to modify the input and forward chains is shown here. Make sure these rules appear above any Docker rules, and always have a means to locally access your Raspberry Pi when making changes to iptables in case you make a mistake and lock yourself out. The input chain default policy is set to drop with input chain rules to allow connections on the BlastShield™ interface and to allow the related and established connection state. The forward chain has a rule to drop any new connections, not on the BlastShield™ interface.
$ sudo iptables -A INPUT -i blastshield -m conntrack --ctstate NEW,ESTABLISHED -j ACCEPT
$ sudo iptables -A INPUT -m conntrack --ctstate RELATED,ESTABLISHED -j ACCEPT
$ sudo iptables -I FORWARD 1 ! -i blastshield -m conntrack --ctstate NEW -j DROP
$ sudo iptables --policy INPUT DROP
Conclusion
With these steps, you can now securely access your Docker containers. You can add more agents and users as suits your needs and then create policies to authorize access. You can even create policies to allow access between different Docker servers. This method works equally well on cloud server infrastructure to combine cloud instances on the same network as the Raspberry Pi.
We will talk about securely connecting IoT devices and connecting to workloads on the Cloud in future posts.

Follow Us


Experience the simplicity of BlastShield to secure your OT network and legacy infrastructure.


.svg)